Introduction to DIY Aroma Stones: Natural Home Refreshers
Are you looking for a simple way to enhance the atmosphere in your home? DIY aroma stones are a fantastic solution! These delightful creations not only add a pleasant scent to your living space but also serve as charming decor. With just a few ingredients, you can craft your own aroma stones that reflect your personal style and preferences.
In this guide, we will explore the benefits of using DIY aroma stones. You’ll discover how they can transform your home into a fragrant oasis. Plus, we’ll provide you with easy-to-follow instructions to make your own. So, let’s dive into the wonderful world of DIY aroma stones!
The Benefits of Using DIY Aroma Stones: Natural Home Refreshers
DIY aroma stones offer numerous advantages that make them a must-try for any home. Here are some key benefits:
- Natural Freshness: Unlike synthetic air fresheners, aroma stones use essential oils, providing a natural and safe way to scent your home.
- Customizable Scents: You can mix and match essential oils to create a unique fragrance that suits your mood or the season.
- Long-lasting Aroma: Once made, these stones can release their scent for weeks, ensuring your home stays fresh without constant upkeep.
- Eco-Friendly: By using natural ingredients, you contribute to a healthier environment, reducing your carbon footprint.
- Decorative Touch: Aroma stones can be shaped and colored to match your home decor, adding a personal touch to your space.
With these benefits in mind, it’s clear that DIY aroma stones are not just a fun project; they are a practical addition to any home. Ready to get started? Let’s gather our ingredients and make some aromatic magic!
Ingredients for DIY Aroma Stones: Natural Home Refreshers
Creating your own DIY aroma stones is not only fun but also requires just a few simple ingredients. Here’s what you’ll need to get started:
- Baking Soda: This is the main ingredient that forms the base of your aroma stones. It helps absorb moisture and releases fragrance over time.
- Water: You’ll need water to mix with the baking soda, creating a dough-like consistency for shaping your stones.
- Essential Oils: Choose your favorite essential oils for scent. Popular options include lavender, lemon, eucalyptus, and peppermint. Each oil brings its unique aroma and benefits.
- White Vinegar: A small amount of vinegar can help enhance the scent and improve the texture of your mixture.
- Food Coloring (optional): If you want to add a splash of color to your aroma stones, food coloring is a great choice. It’s safe and easy to use.
- Silicone Molds: These molds will help shape your stones. You can use any shape you like, from hearts to stars, depending on your preference.
Gather these ingredients, and you’ll be ready to create your own delightful aroma stones. The process is straightforward, and the results are sure to brighten up your home. Let’s move on to the next step and prepare our mixture!
Step-by-Step Preparation of DIY Aroma Stones: Natural Home Refreshers
Now that you have all your ingredients ready, it’s time to dive into the fun part—making your DIY aroma stones! Follow these simple steps to create your own natural home refreshers. Each step is easy to follow, ensuring you’ll have a delightful experience crafting these aromatic treasures.
Step 1: Gather Your Materials
Before you start, make sure you have everything you need within reach. Gather the following materials:
- Baking soda
- Water
- Your chosen essential oils
- White vinegar
- Food coloring (optional)
- Silicone molds
- A mixing bowl
- A spoon or spatula for mixing
Having all your materials ready will make the process smoother and more enjoyable. Once you have everything, you’re set to begin!
Step 2: Mix the Base Ingredients
In a mixing bowl, combine one cup of baking soda with half a cup of water. Stir the mixture well until it forms a thick, dough-like consistency. If it’s too dry, add a little more water, but be careful not to make it too runny. The right texture is key to shaping your aroma stones.
Next, add a tablespoon of white vinegar to the mixture. This will help enhance the scent and improve the overall texture. Mix everything together until it’s well combined. You should have a smooth, moldable dough ready for the next step!
Step 3: Add Essential Oils for Scent
Now comes the fun part—adding your favorite essential oils! Choose scents that you love or that fit the mood you want to create in your home. For a calming atmosphere, lavender is a great choice. If you prefer something refreshing, try lemon or eucalyptus.
Add about 10-15 drops of essential oil to your mixture. Feel free to experiment with different combinations to find your perfect scent. Mix thoroughly to ensure the oils are evenly distributed throughout the dough.
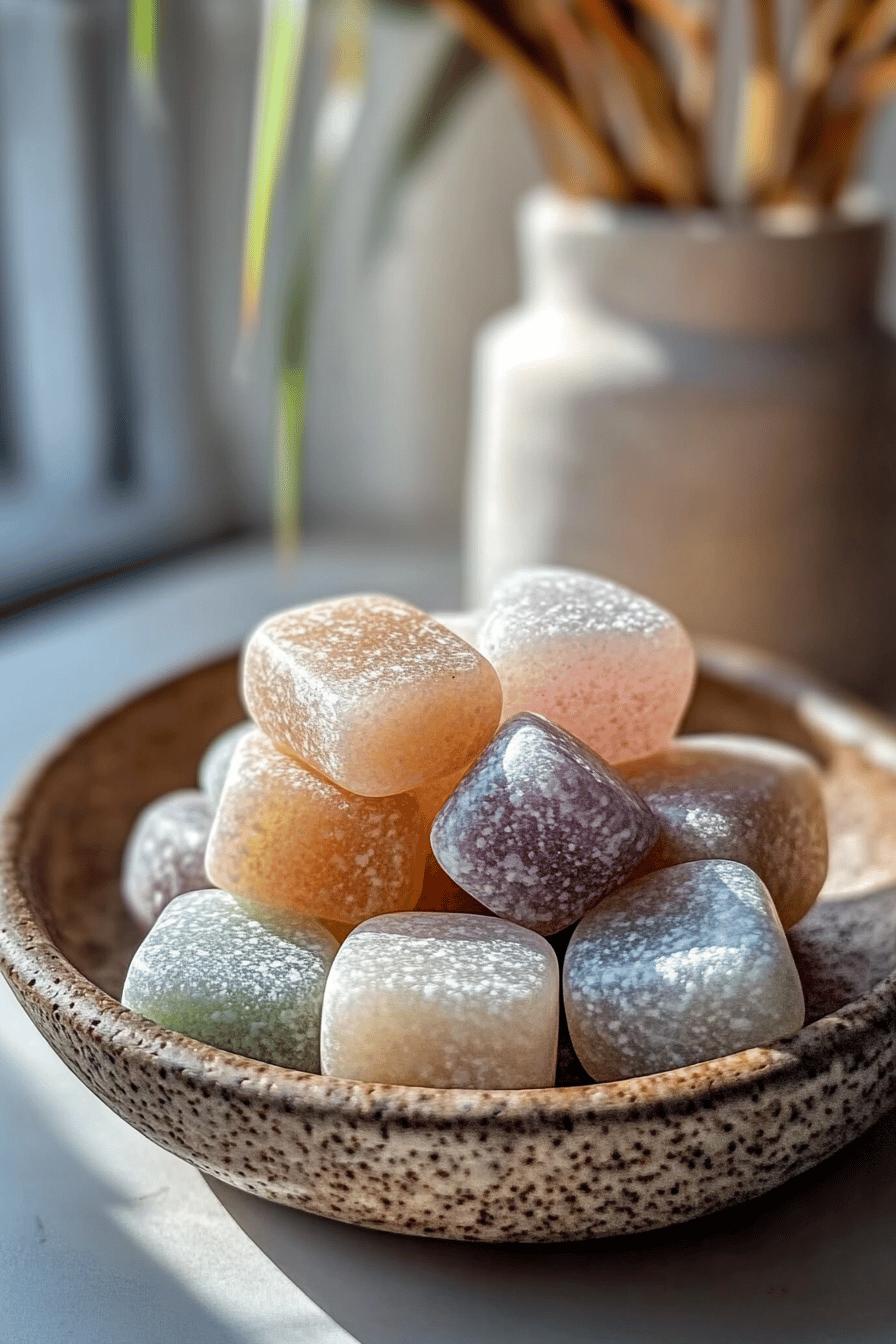
Step 4: Shape the Aroma Stones
Once your mixture is ready, it’s time to shape your aroma stones! Take your silicone molds and fill them with the dough. Press down firmly to ensure there are no air pockets. You can create various shapes, from simple circles to fun designs like stars or hearts.
After filling the molds, smooth the tops with a spatula or your fingers for a neat finish. This step adds a nice touch to your finished stones!
Step 5: Allow to Dry
Now that your aroma stones are shaped, it’s time to let them dry. Place the filled molds in a cool, dry area. Allow them to dry for at least 24 hours. The drying time may vary depending on humidity levels, so check them periodically.
Once they are completely dry, gently pop the stones out of the molds. You’ll be left with beautiful, fragrant stones ready to refresh your home!
With these simple steps, you’ve created your very own DIY aroma stones. They’re not only a great way to add scent to your space but also a fun project to share with family and friends. Let’s explore some variations and tips to make your aroma stones even more special!
Variation of DIY Aroma Stones: Natural Home Refreshers
Once you’ve mastered the basic recipe for DIY aroma stones, it’s time to get creative! There are many ways to customize your stones to suit your style and preferences. Let’s explore some exciting variations that can enhance your aroma stones even further.
Different Essential Oil Combinations
The beauty of DIY aroma stones lies in their versatility. You can mix and match essential oils to create unique scents that reflect your personality. Here are some delightful combinations to consider:
- Relaxing Blend: Combine lavender and chamomile for a soothing aroma that promotes relaxation and calmness.
- Invigorating Citrus: Mix lemon, orange, and grapefruit for a bright and uplifting scent that energizes your space.
- Herbal Freshness: Blend rosemary and mint for a refreshing and herbaceous fragrance that awakens the senses.
- Warm and Cozy: Use cinnamon and vanilla for a comforting scent that makes your home feel warm and inviting.
- Earthy Essence: Combine cedarwood and patchouli for a grounding aroma that connects you with nature.
Feel free to experiment with different ratios of oils to find the perfect balance for your aroma stones. The possibilities are endless, and you can create a scent for every season or occasion!
Colorful Additions to Your Aroma Stones
Adding color to your DIY aroma stones can make them even more visually appealing. Here are some fun ideas to incorporate color into your creations:
- Food Coloring: As mentioned earlier, you can use food coloring to tint your stones. Add a few drops to the mixture before shaping them. You can create a single color or swirl multiple colors together for a marbled effect.
- Herbal Infusions: Consider adding dried herbs or flower petals to your mixture. Lavender buds, rose petals, or dried mint leaves can add both color and texture to your stones.
- Glitter: For a touch of sparkle, mix in some biodegradable glitter. This will give your aroma stones a fun, festive look without harming the environment.
These colorful additions not only enhance the aesthetic appeal of your aroma stones but also make them a delightful gift for friends and family. With these variations, you can truly personalize your DIY aroma stones and make them a unique reflection of your style!
Cooking Note for DIY Aroma Stones: Natural Home Refreshers
When crafting your DIY aroma stones, it’s essential to keep a few cooking notes in mind to ensure the best results. These tips will help you create stones that not only smell wonderful but also look great and last longer.
First, always measure your ingredients accurately. Using the right proportions of baking soda, water, and vinegar is crucial for achieving the perfect dough-like consistency. If your mixture is too dry, your stones may crumble. Conversely, if it’s too wet, they may not hold their shape.
Next, consider the drying environment. A cool, dry area is ideal for letting your aroma stones set. Avoid placing them in direct sunlight or humid areas, as this can affect the drying process. If you live in a particularly humid climate, you might want to extend the drying time to ensure they are completely solid before removing them from the molds.
Additionally, be mindful of the essential oils you choose. Some oils can be more potent than others, so start with a smaller amount and adjust according to your preference. Remember, you can always add more oil, but it’s challenging to reduce the scent once it’s mixed in.
Lastly, if you plan to use food coloring, do so sparingly. A few drops can go a long way in achieving vibrant colors. Mixing different colors can create beautiful effects, but be cautious not to overdo it, as this can affect the texture of your stones.
By following these cooking notes, you’ll ensure that your DIY aroma stones turn out beautifully and provide a delightful fragrance for your home. Now that you’re equipped with these tips, let’s explore some creative serving suggestions for your aromatic creations!
Serving Suggestions for DIY Aroma Stones: Natural Home Refreshers
Now that you’ve crafted your beautiful DIY aroma stones, it’s time to think about how to showcase them in your home. These stones not only serve as delightful decor but also provide a gentle, lasting fragrance. Here are some creative placement ideas and gift suggestions to help you make the most of your aromatic creations.
Placement Ideas Around Your Home
Finding the perfect spots for your aroma stones can enhance their effectiveness and beauty. Here are some great placement ideas:
- Living Room: Place a few aroma stones on your coffee table or bookshelf. They will add a lovely scent while also serving as decorative pieces.
- Bedroom: Keep a stone on your nightstand or dresser. The calming scents, like lavender, can help you relax and promote better sleep.
- Bathroom: Set a stone on the bathroom counter or in a decorative dish. It will keep the space smelling fresh and inviting.
- Kitchen: Place aroma stones near the sink or on a windowsill. Citrus scents can help neutralize cooking odors and create a refreshing atmosphere.
- Entryway: Put a stone in a small bowl by the front door. This will greet guests with a pleasant aroma as they enter your home.
Feel free to mix and match different scents in various rooms to create a unique ambiance throughout your home. The versatility of aroma stones allows you to customize the fragrance experience in every space!
Gift Ideas Using DIY Aroma Stones: Natural Home Refreshers
DIY aroma stones make wonderful gifts for friends and family. Here are some thoughtful gift ideas that incorporate your fragrant creations:
- Gift Sets: Create a gift set with several aroma stones in different scents. Package them in a decorative box or basket for a lovely presentation.
- Personalized Stones: Customize stones with specific scents that you know the recipient loves. This personal touch shows you care and have put thought into the gift.
- Home Spa Kit: Pair aroma stones with other DIY spa items, like homemade bath salts or candles. This creates a relaxing home spa experience for the recipient.
- Seasonal Gifts: Make aroma stones with seasonal scents, like cinnamon and clove for winter or floral scents for spring. These can be perfect for holiday or birthday gifts.
- Party Favors: If you’re hosting a gathering, consider giving guests a small aroma stone as a party favor. It’s a unique and memorable way to thank them for coming.
With these gift ideas, you can share the joy of DIY aroma stones with others. They are not only practical but also a heartfelt way to show appreciation and love. Now that you have some serving suggestions, let’s move on to tips for making the best DIY aroma stones!
Tips for Making the Best DIY Aroma Stones: Natural Home Refreshers
Creating DIY aroma stones can be a fun and rewarding experience. To ensure your stones turn out perfectly, here are some helpful tips to keep in mind. These suggestions will help you achieve the best results and make your crafting process even more enjoyable.
Choose Quality Essential Oils
When selecting essential oils, opt for high-quality, pure oils. This will ensure that your aroma stones have a strong and pleasant scent. Look for oils that are labeled as 100% pure and free from additives. This way, you can enjoy the full benefits of aromatherapy in your home.
Experiment with Ratios
Don’t be afraid to play around with the amount of essential oil you use. If you prefer a stronger scent, add a few more drops. Conversely, if you want a lighter aroma, reduce the number of drops. Finding the right balance is key to creating a fragrance that you love.
Use Fresh Ingredients
For the best results, make sure your baking soda and other ingredients are fresh. Old baking soda may not work as effectively, leading to less fragrant stones. Check the expiration dates on your ingredients to ensure they are still good to use.
Consider Texture
The texture of your mixture is crucial for shaping your aroma stones. If the dough is too crumbly, add a little more water. If it’s too wet, sprinkle in some extra baking soda. The right consistency will make it easier to mold and will help your stones hold their shape.
Be Patient with Drying
Allow your aroma stones to dry completely before removing them from the molds. This may take longer in humid conditions, so be patient. If they feel soft or damp, give them more time to dry. Proper drying ensures that your stones are sturdy and long-lasting.
Store Properly
Once your aroma stones are ready, store them in a cool, dry place. Avoid direct sunlight, as this can fade the colors and diminish the scent. If you want to keep them fresh, consider placing them in a sealed container when not in use.
By following these tips, you’ll be well on your way to creating beautiful and fragrant DIY aroma stones. They will not only enhance your home but also provide a delightful sensory experience. Now that you have these tips, let’s break down the time needed for this fun project!
Breakdown of Time for DIY Aroma Stones: Natural Home Refreshers
When embarking on your DIY aroma stones project, it’s helpful to know how much time you’ll need. This way, you can plan accordingly and enjoy the process without feeling rushed. Here’s a breakdown of the time required for each step of making your natural home refreshers.
Prep Time
The prep time for making DIY aroma stones is quite minimal. You’ll spend about 10 to 15 minutes gathering your materials and mixing the base ingredients. This includes measuring out the baking soda, water, and vinegar, as well as adding your chosen essential oils. If you decide to incorporate food coloring or other decorative elements, it may take an extra few minutes. Overall, you can expect to spend around 15 minutes on preparation.
Cooking Time
While there’s no actual cooking involved in this project, the drying time is crucial. After shaping your aroma stones, they need to dry for at least 24 hours. Depending on the humidity in your area, this time may vary. In some cases, it might take up to 48 hours for the stones to dry completely. So, while the active time is short, be sure to plan for the drying period to ensure your stones are ready for use.
Total Time
In total, you can expect to spend about 15 minutes actively working on your DIY aroma stones, followed by a drying period of 24 to 48 hours. This means that from start to finish, you’ll have your delightful aroma stones ready in about one to two days. This makes it a perfect weekend project or a fun activity to do with family and friends!
With this time breakdown, you can easily fit the creation of DIY aroma stones into your schedule. Now that you know how long it takes, let’s move on to the nutritional information for these delightful home refreshers!
Nutritional Information for DIY Aroma Stones: Natural Home Refreshers
While DIY aroma stones are not meant for consumption, it’s still interesting to consider their ingredients from a nutritional perspective. Understanding the components can help you appreciate the natural elements that contribute to their effectiveness as home refreshers. Here’s a breakdown of the nutritional information for the main ingredients used in your aroma stones.
Calories
The primary ingredient in DIY aroma stones is baking soda. It contains minimal calories, as it is primarily a leavening agent and not a food product. In fact, one teaspoon of baking soda has about 0 calories. Since the other ingredients, like essential oils and vinegar, are used in small amounts, the overall caloric content of your aroma stones is negligible. This means you can enjoy the delightful scents without worrying about any caloric intake!
Protein
DIY aroma stones do not provide any significant protein content. Baking soda, vinegar, and essential oils are not sources of protein. Therefore, if you’re looking for a protein boost, you’ll need to look elsewhere. However, the focus of these stones is on creating a pleasant aroma and enhancing your home environment, rather than providing nutritional value.
Sodium
Baking soda does contain sodium, which is an important mineral for the body. One teaspoon of baking soda has about 1,200 milligrams of sodium. However, since you are not consuming the aroma stones, this sodium content is not a concern. It’s essential to remember that the purpose of these stones is to refresh your home naturally, not to provide nutritional benefits.
In summary, while DIY aroma stones do not offer nutritional value, they are made from safe, natural ingredients that enhance your living space. Enjoy the delightful scents they provide without any worries about calories, protein, or sodium. Now that we’ve covered the nutritional information, let’s move on to some frequently asked questions about DIY aroma stones!
FAQs about DIY Aroma Stones: Natural Home Refreshers
What are DIY aroma stones?
DIY aroma stones are small, decorative stones made from a mixture of baking soda, water, and essential oils. They are designed to release pleasant scents into your home, providing a natural and eco-friendly alternative to synthetic air fresheners. These stones can be shaped into various designs and colors, making them not only functional but also a charming addition to your home decor.
How long do DIY aroma stones last?
Once your DIY aroma stones are fully dried, they can last for several weeks to a few months, depending on the essential oils used and the environment in which they are placed. To maintain their scent, it’s best to keep them in a cool, dry area away from direct sunlight. Over time, the aroma may fade, but you can easily refresh them by adding a few drops of essential oil to the surface.
Can I use any essential oil for DIY aroma stones?
Yes, you can use a variety of essential oils for your DIY aroma stones! Popular choices include lavender, lemon, eucalyptus, and peppermint. However, it’s important to choose high-quality, pure essential oils to ensure the best scent and benefits. Some oils may have stronger aromas than others, so feel free to experiment with different combinations to find the perfect fragrance for your home.
How do I refresh the scent of my DIY aroma stones?
Refreshing the scent of your DIY aroma stones is simple! Just add a few drops of your favorite essential oil directly onto the surface of the stones. Allow the oil to absorb for a few minutes before placing them back in their designated spots. This will help revive the aroma and keep your home smelling fresh and inviting.
Conclusion on DIY Aroma Stones: Natural Home Refreshers
In conclusion, DIY aroma stones are a delightful and practical way to enhance the ambiance of your home. They offer a natural alternative to synthetic air fresheners, allowing you to enjoy customizable scents that reflect your personal style. With just a few simple ingredients, you can create beautiful, fragrant stones that not only smell wonderful but also serve as charming decor.
Throughout this guide, we’ve explored the benefits of using DIY aroma stones, the ingredients needed, and the step-by-step process to make them. We’ve also discussed various ways to customize your stones, from essential oil combinations to colorful additions. Plus, we’ve shared tips for making the best aroma stones and creative serving suggestions to showcase your creations.
Whether you’re looking to refresh your living space or create thoughtful gifts for loved ones, DIY aroma stones are a fantastic choice. They are easy to make, eco-friendly, and can last for weeks, providing a gentle touch of aroma to any room. So, gather your materials, unleash your creativity, and enjoy the process of crafting these lovely home refreshers!
As you embark on your DIY journey, remember to have fun and experiment with different scents and designs. The possibilities are endless, and each batch of aroma stones can be a unique reflection of your personality. Happy crafting!
Relevant Recipes Link: