Introduction to Cheesy Baked Corn on the Cob
Welcome to the delightful world of Cheesy Baked Corn on the Cob! This dish is not just a side; it’s a celebration of flavors and textures. Imagine biting into a warm, buttery corn cob, topped with a luscious layer of melted cheese. It’s a simple yet satisfying treat that can brighten up any meal. Whether you’re hosting a barbecue or enjoying a cozy dinner at home, this recipe is sure to impress.
What Makes Cheesy Baked Corn on the Cob Special?
What sets Cheesy Baked Corn on the Cob apart is its unique combination of fresh ingredients and rich flavors. The star of the show is, of course, the corn. When you use fresh corn, it bursts with sweetness and juiciness. The garlic-infused butter adds a savory touch, enhancing the natural taste of the corn. Finally, the gooey mozzarella cheese creates a creamy layer that ties everything together. This dish is not just about eating; it’s about experiencing a delightful blend of flavors that dance on your palate.
The Comfort Food Appeal of Cheesy Baked Corn on the Cob
Comfort food is all about warmth and satisfaction, and Cheesy Baked Corn on the Cob delivers just that. It evokes feelings of nostalgia, reminding many of summer barbecues and family gatherings. The gooey cheese and buttery corn create a cozy atmosphere, making it perfect for any occasion. Plus, it’s easy to prepare, allowing you to focus on enjoying your time with loved ones. This dish is not only delicious but also brings people together, making it a must-try for anyone who loves comfort food.
Ingredients for Cheesy Baked Corn on the Cob
To create the mouthwatering Cheesy Baked Corn on the Cob, you’ll need a few simple ingredients. Each one plays a vital role in bringing out the best flavors. Here’s what you’ll need:
- 4 fresh corn cobs, husked and cleaned
- 1/2 cup unsalted butter
- 3 cloves garlic, minced
- 1 cup shredded mozzarella cheese
- Salt, to taste
- Black pepper, to taste
- Optional: Fresh parsley or chives for garnish
These ingredients are easy to find and can be adjusted based on your preferences. For instance, if you love a bit of spice, consider adding some red pepper flakes to the garlic butter. Or, if you prefer a different cheese, feel free to experiment with cheddar or pepper jack. The beauty of this recipe lies in its versatility, allowing you to customize it to suit your taste!
Step-by-Step Preparation of Cheesy Baked Corn on the Cob
Now that you have your ingredients ready, it’s time to dive into the fun part: preparing your Cheesy Baked Corn on the Cob! Follow these simple steps to create a dish that’s sure to impress.
Step 1: Preparing the Corn
Start by preparing your fresh corn cobs. First, remove the husks and silk from each cob. Rinse them under cold water to ensure they are clean. Pat them dry with a kitchen towel. This step is crucial as it helps the butter and cheese adhere better to the corn. Once cleaned, set the corn aside while you prepare the garlic-infused butter.
Step 2: Making the Garlic-Infused Butter
Next, let’s make the garlic-infused butter. In a small saucepan, melt the unsalted butter over low heat. Once melted, add the minced garlic. Stir the mixture gently and let it simmer for about 2-3 minutes. This allows the garlic to release its wonderful aroma and flavor into the butter. Be careful not to let the garlic burn, as it can turn bitter. Once ready, remove the saucepan from heat and set it aside to cool slightly.
Step 3: Brushing the Corn with Butter
Now it’s time to brush the corn with that delicious garlic-infused butter! Using a pastry brush, generously coat each corn cob with the melted butter. Make sure to cover all sides for maximum flavor. If you like, sprinkle a little salt and black pepper over the corn at this stage. This will enhance the taste even more. Once all the cobs are buttered, you’re ready to bake!
Step 4: Baking the Corn
Preheat your oven to 400°F (200°C). Place the buttered corn cobs on a baking sheet lined with parchment paper. This will help with easy cleanup later. Bake the corn in the preheated oven for about 20 minutes. This step allows the corn to cook through and absorb all the buttery goodness. The aroma will fill your kitchen, making it hard to wait!
Step 5: Adding the Cheese
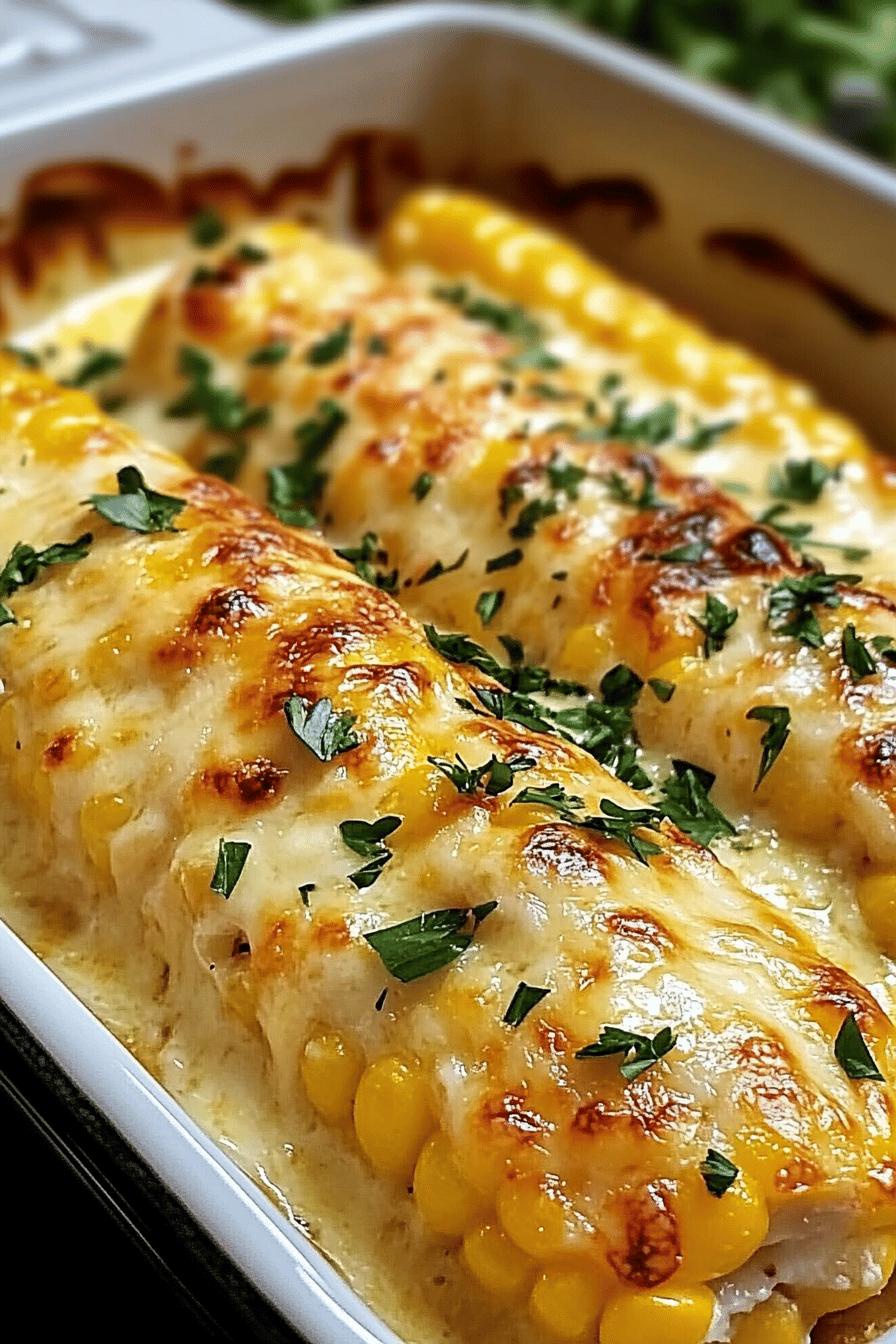
After 20 minutes, take the corn out of the oven. Now comes the best part—adding the cheese! Sprinkle a generous amount of shredded mozzarella cheese over each corn cob. Make sure to cover them well, as the more cheese, the better! If you’re feeling adventurous, you can mix in some other cheeses for added flavor.
Step 6: Final Baking for a Gooey Finish
Return the baking sheet to the oven and bake for an additional 10 minutes. This will melt the cheese and create that gooey, irresistible layer on top of the corn. Keep an eye on it to ensure the cheese doesn’t burn. Once it’s bubbly and golden, remove the corn from the oven. Let it cool for a minute before serving. Your Cheesy Baked Corn on the Cob is now ready to be enjoyed!
Variations of Cheesy Baked Corn on the Cob
While the classic Cheesy Baked Corn on the Cob is already a hit, there are many fun variations to explore! These twists can add exciting flavors and make your dish even more enjoyable. Let’s dive into two delicious options: Spicy Cheesy Baked Corn on the Cob and Herb-Infused Cheesy Baked Corn on the Cob.
Spicy Cheesy Baked Corn on the Cob
If you love a little heat, this spicy version is perfect for you! To make Spicy Cheesy Baked Corn on the Cob, start by adding some heat to your garlic-infused butter. Mix in 1 teaspoon of cayenne pepper or red pepper flakes when you melt the butter. This will give your corn a delightful kick. You can also top the cheese with sliced jalapeños before the final baking. The combination of gooey cheese and spicy peppers creates a mouthwatering experience that will leave you wanting more!
Herb-Infused Cheesy Baked Corn on the Cob
For a fresh and fragrant twist, try the Herb-Infused Cheesy Baked Corn on the Cob. Begin by adding fresh herbs to your garlic-infused butter. Chopped basil, thyme, or rosemary work wonderfully. Simply stir in about 1 tablespoon of your chosen herbs into the melted butter. This will infuse the corn with a lovely herbal aroma. After adding the cheese, sprinkle some extra herbs on top for a beautiful presentation. This variation is perfect for those who enjoy a garden-fresh taste!
These variations not only enhance the flavor but also allow you to customize your Cheesy Baked Corn on the Cob to suit your taste buds. Feel free to mix and match ingredients to create your own unique version!
Cooking Note for Cheesy Baked Corn on the Cob
When preparing Cheesy Baked Corn on the Cob, a few cooking notes can help ensure your dish turns out perfectly every time. First, always choose fresh corn when possible. Fresh corn not only tastes better but also has a delightful crunch that enhances the overall experience. If you can’t find fresh corn, frozen corn can be a good alternative, but the texture may differ slightly.
Next, be mindful of the baking time. Ovens can vary, so keep an eye on your corn as it bakes. You want the corn to be tender but not mushy. The cheese should melt beautifully, creating that gooey layer we all love. If you notice the cheese browning too quickly, you can cover the corn loosely with aluminum foil to prevent burning.
Additionally, feel free to adjust the seasoning to your liking. Some people enjoy a bit more salt or pepper, while others might prefer a sprinkle of paprika or garlic powder for an extra kick. Taste as you go to find the perfect balance for your palate.
Lastly, let the corn cool for a minute after baking. This will make it easier to handle and allow the cheese to set slightly, making it less messy to eat. With these tips in mind, you’re all set to create a delicious batch of Cheesy Baked Corn on the Cob that will impress your family and friends!
Serving Suggestions for Cheesy Baked Corn on the Cob
Now that you’ve prepared your Cheesy Baked Corn on the Cob, it’s time to think about how to serve it! This dish is versatile and can complement a variety of main courses. Plus, there are many creative ways to present it that will make your meal even more enjoyable. Let’s explore some delicious pairing options and fun serving ideas!
Pairing Cheesy Baked Corn on the Cob with Main Dishes
Cheesy Baked Corn on the Cob pairs wonderfully with many main dishes. Here are some tasty options to consider:
- Grilled Chicken: The smoky flavor of grilled chicken complements the buttery corn perfectly. Serve the corn alongside a juicy chicken breast for a satisfying meal.
- Barbecue Ribs: The sweetness of the corn balances the tangy barbecue sauce on ribs. This combination is a classic for summer cookouts!
- Steak: A perfectly cooked steak with a side of cheesy corn creates a hearty dinner. The richness of the cheese enhances the flavors of the meat.
- Vegetarian Burgers: For a meat-free option, pair the corn with a flavorful veggie burger. The cheesy corn adds a delightful touch to your plant-based meal.
These pairings not only enhance the flavors of your meal but also create a well-rounded dining experience. Feel free to mix and match based on your preferences!
Creative Serving Ideas for Cheesy Baked Corn on the Cob
Presentation can elevate your Cheesy Baked Corn on the Cob from simple to spectacular. Here are some creative serving ideas:
- On a Platter: Arrange the corn cobs on a large serving platter. Garnish with fresh herbs like parsley or chives for a pop of color. This makes for an eye-catching centerpiece!
- Individual Servings: Cut the corn into smaller pieces and serve them in small bowls. This is perfect for parties or gatherings, allowing guests to enjoy them easily.
- With Dipping Sauces: Offer a variety of dipping sauces, such as ranch dressing or spicy mayo, alongside the corn. This adds an interactive element to your meal.
- As a Salad Topping: Chop the cheesy corn and use it as a topping for salads. It adds a delicious twist to your greens and makes the salad more filling.
These serving suggestions will not only enhance the dining experience but also impress your guests. Enjoy your Cheesy Baked Corn on the Cob in style!
Tips for Perfecting Cheesy Baked Corn on the Cob
To make your Cheesy Baked Corn on the Cob truly unforgettable, consider these helpful tips. They will ensure that every bite is bursting with flavor and that your dish turns out perfectly every time.
- Choose the Right Corn: Always opt for fresh, in-season corn. Look for cobs that are bright green and tightly wrapped in husks. The kernels should be plump and milky when you press them. Fresh corn will give you the best flavor and texture.
- Don’t Skip the Butter: The garlic-infused butter is key to this recipe. Make sure to brush it generously on all sides of the corn. This not only adds flavor but also helps the cheese melt beautifully.
- Experiment with Cheese: While mozzarella is a classic choice, don’t hesitate to mix in other cheeses. Cheddar, gouda, or even feta can add unique flavors. Just remember to adjust the amount based on the cheese’s strength.
- Watch the Baking Time: Ovens can vary, so keep an eye on your corn as it bakes. You want the corn to be tender but not mushy. If the cheese starts to brown too quickly, cover it loosely with foil.
- Garnish for Extra Flavor: After baking, sprinkle fresh herbs like parsley or cilantro on top. This adds a burst of color and freshness that enhances the overall taste.
- Serve Immediately: Cheesy Baked Corn on the Cob is best enjoyed fresh out of the oven. The cheese is gooey and delicious when hot, so serve it right away for the best experience.
- Get Creative with Toppings: Consider adding toppings like crumbled bacon, diced tomatoes, or even a drizzle of hot sauce for an extra kick. These additions can elevate your dish to a whole new level!
By following these tips, you’ll be well on your way to creating the perfect Cheesy Baked Corn on the Cob. Each bite will be a delightful experience, making it a favorite at your table!
Breakdown of Time for Cheesy Baked Corn on the Cob
Understanding the time needed for each step in making Cheesy Baked Corn on the Cob can help you plan your cooking better. Here’s a simple breakdown of the time required for preparation and cooking.
Prep Time
The prep time for Cheesy Baked Corn on the Cob is quite short. You’ll need about 15 minutes to gather your ingredients and prepare the corn. This includes husking the corn, making the garlic-infused butter, and brushing the corn with it. It’s a quick and easy process that sets the stage for the delicious baking to come!
Cooking Time
Once your corn is prepped, the cooking time is approximately 30 minutes. This includes 20 minutes of baking the corn to allow it to cook through and absorb the buttery flavor. After that, you’ll bake it for an additional 10 minutes with the cheese on top to achieve that gooey, melted perfection. Keep an eye on it to ensure the cheese doesn’t burn!
Total Time
In total, you can expect to spend about 45 minutes from start to finish. This includes both prep and cooking time. With such a quick turnaround, you can easily whip up this delightful dish for a weeknight dinner or a special gathering. The best part? The delicious aroma and cheesy goodness will have everyone eagerly waiting to dig in!
Nutritional Information for Cheesy Baked Corn on the Cob
Understanding the nutritional content of your Cheesy Baked Corn on the Cob can help you enjoy this delicious dish while keeping track of your dietary needs. Here’s a breakdown of the key nutritional components per serving, which typically includes one corn cob topped with cheese.
Calories
Each serving of Cheesy Baked Corn on the Cob contains approximately 250 calories. This makes it a satisfying side dish that can fit into a balanced meal. The calories primarily come from the corn, butter, and cheese, providing a delightful mix of flavors and energy.
Protein
In terms of protein, you can expect about 8 grams per serving. The protein mainly comes from the mozzarella cheese, which adds a creamy texture and helps keep you feeling full. This makes it a great option for those looking to increase their protein intake while enjoying a tasty side dish.
Sodium
Each serving contains around 400 milligrams of sodium. This amount can vary based on how much salt you add during preparation. If you’re watching your sodium intake, consider using less salt or opting for low-sodium butter. This way, you can still enjoy the rich flavors without going overboard on sodium.
Overall, Cheesy Baked Corn on the Cob is a delicious and nutritious addition to your meals. With its balance of calories, protein, and sodium, it can be enjoyed as part of a healthy diet. Just remember to savor each bite!
FAQs about Cheesy Baked Corn on the Cob
Can I use frozen corn for Cheesy Baked Corn on the Cob?
Yes, you can use frozen corn for Cheesy Baked Corn on the Cob! However, keep in mind that fresh corn offers the best flavor and texture. If you choose frozen corn, make sure to thaw it completely and drain any excess water before using it. This will help ensure that your dish doesn’t become watery. While the taste may differ slightly, frozen corn can still be a convenient and tasty option!
How can I make Cheesy Baked Corn on the Cob ahead of time?
If you want to prepare Cheesy Baked Corn on the Cob ahead of time, you can do so easily! Start by following the recipe up to the point of baking. After brushing the corn with garlic-infused butter, wrap each cob in aluminum foil and store them in the refrigerator. When you’re ready to bake, simply preheat your oven and bake the corn as directed. You may need to add a few extra minutes to the baking time if the corn is cold from the fridge. This way, you can enjoy a delicious side dish without the last-minute rush!
What cheese works best for Cheesy Baked Corn on the Cob?
While mozzarella cheese is a classic choice for Cheesy Baked Corn on the Cob, you can experiment with other cheeses as well! Cheddar cheese adds a sharp flavor, while gouda offers a creamy texture. If you’re feeling adventurous, try mixing different cheeses for a unique taste. Just remember to adjust the amount based on the cheese’s strength. The key is to choose a cheese that melts well and complements the buttery corn!
Is Cheesy Baked Corn on the Cob suitable for vegetarians?
Absolutely! Cheesy Baked Corn on the Cob is a vegetarian-friendly dish. It contains no meat, making it a great option for those following a vegetarian diet. Just be sure to check the ingredients in your butter and cheese to ensure they meet your dietary preferences. This dish is not only delicious but also a wonderful way to enjoy fresh vegetables!
Conclusion on Cheesy Baked Corn on the Cob
In conclusion, Cheesy Baked Corn on the Cob is a delightful dish that brings comfort and joy to any meal. Its combination of fresh corn, garlic-infused butter, and gooey cheese creates a flavor explosion that is hard to resist. Whether you’re serving it at a family gathering, a summer barbecue, or simply enjoying it as a side dish, this recipe is sure to impress.
Not only is it easy to prepare, but it also offers endless possibilities for customization. From spicy variations to herb-infused twists, you can make this dish your own. Plus, with its appealing presentation and delicious taste, Cheesy Baked Corn on the Cob is bound to become a favorite among your friends and family.
So, why not give this recipe a try? Gather your ingredients, follow the simple steps, and enjoy the warm, cheesy goodness that awaits. With each bite, you’ll experience the perfect blend of flavors that make this dish a true comfort food classic. Happy cooking!
Relevant Recipes Link:
Ready to indulge in more cheesy and delightful dishes? You’ll love these must-try recipes:
- Cheesy Creamed Corn Casserole: A Flavorful Comfort Food
- Cheesy Baked Ravioli Delight: Irresistibly Cheesy Goodness
- Cheesy Baked Bell Pepper Slices: A Tasty Twist on Stuffed Peppers
For more fantastic recipes and food inspiration, follow us on Pinterest!